
My illustrations are usually created by a process of discovery, actions + reactions to the actions. They involve a series of tests, comparisons, and decisions – during which layers of artwork are often left unused at the end of the piece. Allow me to walk you through the concept, layout, and detail stages of this illustration (for more examples of Inkpad illustrations check out my Flickr photostream).
The Concept
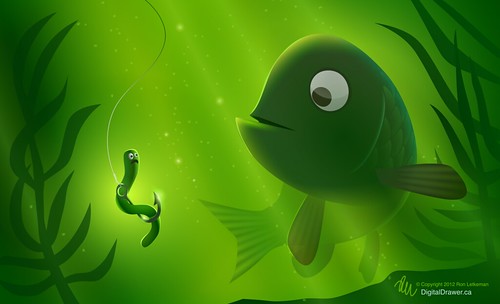
The concept behind this illustration began as a play on words from the phrase "Carpe Diem" ("seize the day")... However, "Carpe Diem" can easily be said as "Carp per diem"(per diem being latin for "daily allowance"). Naturally, the visual of a carp getting his daily meal sprung to mind. So, after some research into what carp roughly looks like, I ventured into this illustration.
The Layout
A quick sketch was made to help establish the mood and composition of the drawing. Very basic shapes were used as the balance of the drawing was considered. Position and size are important here. The worm, being smaller and lower, is in a position of weakness. Basic color tone is also established in this stage - this scene was envisioned to be at the bottom of a warm tropical river so a warm green was selected as the overall color.

This style of illustration relies heavily on lighting to set mood, enhance character features, and help guide the viewer's eye throughout the illustration. All the lighting in this illustration is created by using radial gradients to create highlights and glows that give it a luminescent look. See below for a quick tutorial explaining how the radial gradients were created for this project.

For further details on creating gradients in Inkpad check out my previous tutorials (Part 1 & Part 2).
In the image below you can see how the basic lighting began with gradients. Notice the reflected lighting off the fish's head - the upper section receives the main light source while the right perimeter and bottom of the fish use subtle gradients to illustrate "bounced" light. This helps give the fish volume and gives the illusion of a 3D shape.
 The Glows
Further adjustment to the colors of the radial gradients behind the characters gives a green glow. This is achieved by setting the transparent colour in the radial gradient to a bright green (again, refer to Part 2 of my gradient tutorials for more detailed explanation on how to achieve this effect).
The DetailsAdding the back half of the fish makes the illustration more dramatic. It conveys the appearance that the fish is circling the worm and checking it out. By reducing the transparency, the tail appears to be more distant and less visible – as it would appear in murky water.
The translucent detail on fins and tail were created using a series of radial gradients. See below for the construction sequence.

The specks floating in the water are semi-transparent circles overlayed with radial gradients to give them the effect of having been hit by the light. These were added to create a sense of depth in the water. They also help emphasize the illusion of bright beams of light shining through the water illuminating particles in the murky depths.
 The main light source in this illustration is behind the characters. To enhance this lighting effect and further define the outline of the characters, a thin highlight line was drawn on the edges that "receive" light. See below for a close up example of this technique. These lines were created using the pen tool to carefully outline these highlights.
 The first scale created began as a circle. It was easily modified by double-tapping the left-most anchor point (with the selection tool) to remove the bezier handles and turn it into a corner. Next the handles for both the top and bottom anchor point were rotated to give the scale it's specific shape. Once one scale was done it was relatively easy to duplicate, place and tweak the existing scales. A subtle gradient fill was used to give the scales a sense of volume – and that they overlapped one another.
The final phase of the drawing involved the shape of the weeds that surround the fish and worm. I went through several iterations, trying out various shapes sizes and positioning before settling on a simplified, more transparent version that complemented the drawing.


That's it for this post ... thanks for reading! As always, I look forward to feedback, comments, and questions. Let me know if you have any suggestions for Inkpad tutorials you would like me to cover.
No comments:
Post a Comment